The how (and why) of maintenance part 12
Pre-evaluating before maintenance
When performing maintenance on a leaky ball valve, there is a lot of information that must be evaluated before the actual maintenance is carried out.
One must evaluate the media: Is it a clean gas, or is it heavy hydrocarbons with a lot of pollution? Is there an aggressive or sour media, or is it soft?
Then the construction of the valve: Is it self-relief or double piston?
Is the valve soft seated with soft PTFE or is it a harder material such as PEEK? Or is it metal to metal with tungsten carbide layer on the ball and seats?
What type of radial seals is there on the seats? Is it O-rings, Chevrons or Lip Seals?
How is the valve operated? Is it opened with differential pressure, or fully equalized?
Is the cavity equalized or not? Have the valve been closed with full flow through the valve?
How often is the valve operated, once a week or once a year? How fast is the valve operated? And then the two most important questions; is the valve equipped with lubrication fittings to the seat, if so, how many to each seat? Is the valve equipped with an auxiliary valve to the cavity?
If the valve is equipped with fittings and auxiliary valve there are (as we during many articles have discussed) a lot of possibilities for maintenance, and in many cases the valve may be 100% cured, but in other cases it may be worse after the cleaning, it is not the maintenance that has damaged the valve, but the maintenance has uncovered the state of the valve.
In this article, we will discuss two cases happening on two large valves, one where I was mislead by my own assessment and one where I was lucky when performing the fix. I am using those cases to illustrate how one can be fooled when jumping to conclusions, or how one can be lucky when doing the right assessment.
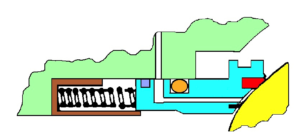
In this first case it was a top entry trunnion ball valve containing 140 bar clean sales gas with condensate. In this case the valve was needed as a first barrier and should be 100% sealed, but the valve was leaking too much. The valve information was as followed: Self-relief construction on the seats witch seals on the up stream seat only. As illustrated in fig. 64 the valve was equipped with soft-seated seats with Peek inserts. As also illustrated in fig. 64 the radial seals on the seats were O-rings. The valve was normally in open position and operated only one or two times a year and had been in service for about 10 years. The valve was never closed in flowing condition or opened with differential pressure
Fig. 64

Figure 64
At the assessment phase it seamed to be a simple solution on the problem. My argumentation was as follows: not opened with differential pressure, not closed at a flowing condition and maximum operations 20 closures and 20 openings equals 40 of 90 degrees movements. With so few operations in a clean media and operations with fully equalized valve I could not see any reasons why the PEEK seal on the seats should leek. As the media was clean sales gas I did not think that deposits could be formed on the ball or seats, that argument was also based upon the condensate actually should work as a cleaner on the seal surfaces. My conclusion on this problem was that the O-ring on the radial seal of the seats may have suffered explosive decompression or now called RGD and the leak path was not between the ball and the seat but between the seat and the seat pocket, as illustration in fig. 64. This could be fixed by injecting sealing component into the O-ring groove.
Because the conclusion in the pre-assessment was RGD in the radial O-ring we did not clean the valve with valve cleaner, but regarded that as waist of time and valve cleaner. To seal of the O-ring we injected pretty much sealing component, I actually thought it was too much required to seal of the valve. We was unable to seal the valve 100% but we managed to get the valve nearly sealed of and kept the cavity without pressure by opening the auxiliary valve in the cavity. We managed to do the required job, but because of the relatively large leak rate passing the valve it was decided to repair the valve in the line (top entry valve).
The whole system was shut down and depressurised to dismantle the ball and seats.
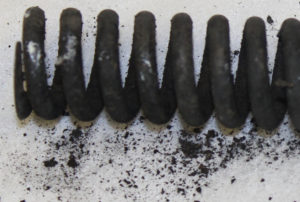
When the seats came out, I did understand that this time I had been fooled by a valve, the valve had tricked me as the O-rings was in perfect condition. But as illustrated in figure 65 the seal area on the seats was full of hard particles that were stuck on the seat. The particle was some 10thof a millimetre high and prevented the seat getting in contact with the ball. We found the same black stuff in the spring pockets and on the coil springs, illustrated in fig. 66.
Fig. 65 Fig. 66

Figure 65

Figure 66
As the media was clean gas and condensate I was quite puzzled. I did clean the seats with valve cleaner and as illustrated in figure 67 the particles on the seal area was dissolved. It was decided to replace all internal parts, and the particles were send to a laboratory for analysis. The result was: Under certain conditions (temperature and pressure drop) the gas molecules will bind in chains and transfer from gas to solid carbon and bind to the seal.
Fig. 67

Figure 67
I have never seen this before, but it taught me an important lesson: If the valve has been without maintenance, always clean the valve; it does not matter if the media have been clean. If we had cleaned the valve it would have been fixed and probably sealed 100%
In the second case it was the opposite; it was where I fooled the valve.
The case was: 42” ESD valve, class 1500 metal seald (TC on ball and seats) top entry, trunnion ball valve, a monster of a valve. The media was “clean” sales gas. The valve was one of the outer barriers towards the installation. When the valve was closed it was leaking too much to set a barrier, and we knew the rotation of the ball was correct. I must add that the valve was equipped with Lip seals as radial seal on the seat, witch was important.
The valve was without lubrication fittings to the seats, and no cavity port for bleeding of the cavity. The valve has been in service around 6 years, operated only for setting barrier 5 to 6 times. I could not see any reasons why this valve should leak.
The only thing I could come up with was as follows: When the ball rotates it drags the seats sideways in the seat pocket, increasing the gap between the seat and seat pocket at 3 o´clock and reducing the gap at 9 o´clock. If the tolerance between the seat and the seat pocket were in the max and minimum area, one could get a lack of contact between the lip seal and the seat pocket at 3 o´clock, creating a leak path, and subsequently a leaky valve.
My suggestion was: Operate the valve around 5 mm towards the open position, and stop. This trying to centre the seat in the seat pocket and creating lip seal contact all around the seat. Not everybody in the production agreed, but they did humour me.
We set it up with the instrument personnel, me on the top of the actuator ready to scream out at the first movement of the valve. An instrument technician at the panel, bypassing the system, moving the valve and stopping at my command. I made a line across the position plate and waited for any movement. At the first mm movement of the indicator, I yelled out and he stopped the valve with less then 5 mm movement and locked the valve. When testing the valve after the movement, you may have guessed it, the valve sealed 100% and I was the hero of the day.
My point being: Don´t jump to conclusions! Remember, “The devil is in the details”
Vil du laste ned denne artikkelen som PDF?
Klikk her for å laste ned
